Showing posts with label organization. Show all posts

Classroom Makeover

I am very blessed. Last year, my classroom was a former storage closet with questionable ventilation. This year I have a new classroom. It's not a full sized classroom, which I'm glad about (it would have been very difficult to decorate). Starting this summer, I began to go into my new classroom for a couple hours at a time to work on creating a fantastic space for my students.

 Below are 2 before/after shots of my classroom. It started off pretty barren as I didn't have many pieces of furniture moving from my storage closet. The overall theme I chose for the room was gray with orange accents and some flair from Pixar's Inside Out. My favorite color is orange and so I send home everything on orange paper. I painted some of the metal furniture gray so that it would coordinate and be less of an eye sore.
 One thing that I picked up from other bloggers is how to organize a room. I tried to split my room into different zones. The first zone is in front of the smart board and I plan to use it for my instructional home base, particularly for my older students. The zone is surrounded by wonderful cabinets filled with my favorite therapy supplies and all my board games. I hope to get curtains to cover up the games and calm down the space. The second zone is my work space. I wanted my desk to face the door so that I could see anyone who enters and also see into the hallway. The final zone is my individual or small group space. I have a smaller, shorter desk that I plan to use with my younger students. Behind the small work table is a play therapy area. I found a great car mat at Ikea for $20 and I just know it will be a hit.
Zone 3: top left, top right, bottom right Zone 1:bottom left

Zone 1: work area
 When students enter, they can pick up their brand new folder out of the milk crate. Because I have 9 grades that I work with, I've found that a milk crate is really the best folder system for me. The middle picture shows my organization for focusing on vocabulary. I have a easy-to-grab bucket for high stakes testing vocabulary for the upper and lower grades (courtesy of Natalie Snyders) and a bin for my prefixes/roots/suffixes vocabulary. Keeping classroom rules and visuals next to the smart board was a must.


Zone 2

I was able to re-do my desk area and have a working desk along with a computer part. This is definitely not the prettiest part of the room, but it functions extremely well.


There were 2-3 layers of labels on these drawers. This room has been used for FACs, a testing room, and a special education room. Goo-gone was my friend when removing these labels. Because I change my mind all the time, I went with chalkboard labels so that I can move materials around and label them as many times as I want.


 Does your school use PBIS? I included our PBIS phrases in my visual classroom matrix (left) and on an Inside Out themed bulletin board. I plan to have students pick one word that is a positive attribute and add it to the bulletin board (We are... strong, smart, funny, etc.). Below my smart board is a bookshelf I brought in from home. This is fantastic as I have put all my resources that I use on a daily basis here. On the shelf are my quick artic activities, social skills lessons, and some language materials.

I hope you enjoyed a tour of my speech room. I am in love with it and can't wait to see the kids' reactions!

Desk Makeover - How I Grew to Hate Scotch Tape

With my excitment over not only staying in the same school for the second year, but also getting a bigger room that functions for me, I started projects early this year. This summer, I decided to take the time off and focus on things such as cleaning, cooking, blogging, and creating materials. Sooo, when I found myself on Pinterest looking up classroom makeovers, I said to myself, "Huh, I could do that! It'd be easy." Ha... well, the good news is that I did it. I also learned quite alot about DIY projects. I started with what I thought was a simple paint job. I walked into my new classroom and found that my desk and a huge metal cabinet were rusty and in very rough shape. I enjoy pretty things and decided to follow the lead of some bloggers I follow (AKA Natalie Snyders and The Speech Bubble). My hands have not lifted a paintbrush since I was 14, but I braved the process.


The workers at Home Depot and Ace Hardware were so wonderful and patiently explained what paint would be best and waited for me to decide which colors I wanted. Since my pieces had already started to rust, I followed recommendations and applied a coat of primer followed by 2 coats of my chosen paint. Here are a few things I learned.

1) There is alot of surface area on a desk to paint. I ended up having to buy a bigger paint roller and paint brush than I thought I needed. Having the larger roll made it so much easier and the job went much quicker.

2) Having a sink in the room where you are painting is amazing! However, it hadn't been used in over two months, so when I turned it on to rinse my brushes and rollers, air from the pipes made water and paint spray EVERYWHERE.

3) When I primed the furniture, at first I was trying to get every little spot. I was disappointed with my primer job because the old metal still showed through the white a little bit, but then I realized that I was not painting the desk white. Reminding myself to not be a perfectionist was important.

4) I HATE Scotch tape. On both the desk and the cabinet, I found dozens of pieces of scotch tape from years of attaching important information. The masking tape was easily removed with goo gone, but the scotch tape did not respond to the goo gone. I thought about using a putty knife, but I didn't have one and I didn't want the metal to scratch up the surface. So, instead I used my nails to peel off every piece I could find. Turns out they make plastic putty knives, wish I had known that from the get go. But! even after all my hunting, I found MORE scotch tape after I started priming. Ugh. I am never using scotch tape on furniture again. Masking tape, maybe.

In the end, I had extra primer and paint and was able to paint one more storage pieces to match. No more mismatched school hand-me-downs, whoop whoop!


Today I Learned: classroom website creation

Every night at the dinner table my dad would ask each of us kids what we learned that day at school. Well, this weekend I learned how to make a website for my speech-language classroom. Our district has moved to a 1:1 iPad initiative for our 7th and 8th grades, and nearly all communications with parents have become digital. Each class from 5th grade and up at my building has a website where they post assignments and news. Seeing as this summer I am all about learning new things, I decided to create my own website for better communication with parents.

Weebly for education has a great site for teachers to create their own classroom websites. The basic service is free and intuitive. Adding text, titles, and pictures is simple with an easy drag and drop editor. Some extra features include password protecting student pages, a place to upload assignments, and the capabilities to add your own photos and videos.

I started off by picking a basic layout and within 30 minutes I had a home page that linked to 3 additional pages. Here's a peek at the website I created!


Because I work with 9 different grades, I split up my website to include an area for the younger grades and the older grades. I focus very heavily on vocabulary as it's a great way to improve generalization and so I created a K-4 page and a 5-8 page that includes the vocabulary word of the week and other things we'll be working on. If you provide theme-based therapy, this is also a great way to share the vocabulary and skills you are working on with students.


Overall, I would recommend creating a Weebly classroom site and I'll keep you posted on how it goes this year!

Back To School Countdown


The countdown to the first day of school has begun... Ashley at Lattes, Lesson Plans, and IEPs organized a back to school link up with a countdown of lists for the year. I'm a little late to the party, but I wanted to post my countdown because it's such a great idea!


I visited my classroom yesterday and began the first few steps of my classroom makeover. I think it's going to take longer than I anticipated. This year I get to move out of a closet and into a much bigger room. I am the first SLP in 5 years to stay more than one school year due to various reasons. When my principal asked me to be honest about the position and what I needed, I told her space. Sometimes as we are in a service profession, we find ways to "make do" with what we have, but I have learned it is always important to advocate, even if you are new to a position. Stay tuned for a post about my classroom make-over!


I send out a monthly e-newsletter to parents and some faculty. This monthly newsletter includes information about my 3:1 indirect service delivery weeks, upcoming school events, articulation practice and general information all parents need know.


Wishes are almost like goals, as they can be attained. Because no SLP has stayed more than a year, some parents were understandably hesitant to build a solid relationship. When it was confirmed that I would be returning, many of the parents seemed pleased (I hope I can live up to their expectations).


Because my sessions are scheduled back-to-back, taking time to retrieve each student can put me off schedule or cause students to lose a couple minutes of their time with me. For many of my students, a school wide PBIS ticket can do the trick, or even a sticker. I'm going to try using a timer and making my students responsible to turn on the timer for each session - we'll see how it goes.


Sunshine coming through my windows should help me keep this promise, but it's always important to smile. Smiling releases endorphins which actually can change your mood.

Thanks for reading my back to school countdown! It'll be here before we know it.

Data and Attendance

Data data data BATMAN!

No matter where you work, collecting data is a big part of the work of an SLP. In my 2 years of working in the public schools, I have changed my data collection method 3 times before I found something I can actually stick with and not utterly despise. I have tried individual folders with goal sheets for kiddos - these were great in theory, but not so great when I had a group of 3 students all around a very tiny table; there was no room for folders. My next attempt was Google Docs. I LOVED this method for articulation because it showed a great progress graph, however, again within a group setting, this method was not always achievable. I found that if I switched forms on my iPad, the other form would delete what I added. Method number 3 was the winner: Labels!

The idea of using labels for daily logs came from Pamela over at Public School SLP. You can find the data labels she created HERE. At first I thought that purchasing labels would be super expensive. But, Amazon sells a generic brand set of 1,000 labels for around $10 and they work just fine with my laser printer. The best thing about labels for me was that at the end of the work day, sticking them onto the pages in my binder was a very mindless task that allowed me to unwind a little before facing traffic.

Even though I write the date on each label, I like to keep a separate page for attendance. I have 1 page for each month. I can track attendance on the computer or print off a sheet for each month. This allows me to see at a glance when students missed sessions, if they have been absent frequently, or if there are any scheduling problems. I created a form in Microsoft Excel to help me easily track the attendance of each student.


Each month has Monday through Friday with the date included. I mark student attendance after I print out the page and can easily see if they were seen one-on-one, in a group, or any other circumstances. I use a one letter key to mark the services students receive each month. Having the document in Excel also allows me to edit the student list. I like to list them in grade order.


I have found that this helps me document attendance very quickly and easily and can make 3rd party billing much simpler. Apparently our district is going to start using codes to document therapy this year, so I hope that this attendance method helps me to more easily completed 3rd party billing - time will tell!

You can find my 2015-2016 attendance calendar in an editable format HERE. Make sure when you go to print off the sheet that you highlight the area you want and select "print selection."

Planning for Fall

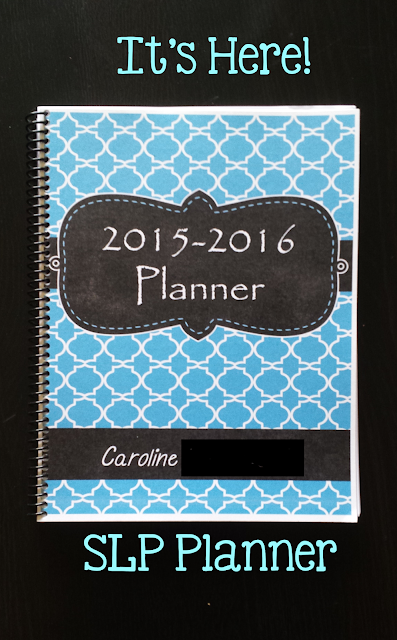
Summer is for relaxing, or so I'm told. I have been on an organization kick. Now that I am staying at the same school, I'm finally able to create a system that works for me. Over the past week, my latest project has been creating my very own planner. While many teachers love specialty planners, I found that the ones I wanted were out of my budget and not completely applicable to speech/language therapy. With all my free time and my clipart collection, I decided to create my own.

Ta Da! I managed to create something that I love. Printing it and having it spiral bound at Kinkos cost me under $30. The spiral binding came with a frosted plastic cover and back. So what's inside?

First off, I am very proud of the cover and think that I will love it all year round. To make the cover and back sturdier, I splurged for card stock and full color printing on those pages.

My favorite part of this planner is a weekly Bible verse from the book of Psalms to help focus the week on what is truly important. Beginning the week off with a reminder of God's love is a great way to start.

I created this planner to be as budget-conscious as possible. The majority of pages are black/white and gray scale to help you save money when printing. I'm planning to add editable covers when I post this as a product to TPT.

Each month has a 2 page spread with spots for writing down report due dates and tasks for the month.
Every month has an attendance sheet that I use. A FREE version of my 2015-2016 editable attendance sheet can be found at my TPT store HERE.

 Inside I created 11 fun note pages (example below). I can't wait to add notes or maybe just fill them with doodles.

Attendance on left                                                                             Notes page on left
The weekly layout has Plenty of room to lesson plan for each day. Each week has its own 2-page spread, complete with room for planning those back-to-back sessions. There's also a handy dandy checklist for each week so I don't forget anything. I see groups back-to-back and often have to plan for 15 or so sessions a day. Having the bi-color days helps me to differentiate the groups. I also love the to do list for the week on the same page. The Psalm for the week below says, "My soul finds rest in God alone; my salvation comes from him" ~Psalm 62:1.


Inside my planner is a section unique for special educators. Finally a place to put all IEP due dates. There are also pages for referrals, screenings, evaluations, and RTI logs. 


Inside you will find a page to store important information such as passwords, websites, emails, or whatever you want.


I'm in the process of laminating binder tabs to make finding the months and important pages a tab (tad) bit easier. 

Everyone has specific ways they like their information set up, but here is the way that I will be keeping organized this year. If you love this planner and want your own copy, you can find it HERE at my TPT store.

I have also created some stickers to quickly add to the planner. They can be printed on return address labels and are color coded for IEPs, evaluation planning meetings, evaluation results meetings, and conferences. Find them HERE at my TPT store. Maybe if I become motivated, I'll make more stickers. What other stickers would you like to see?

Scheduling

Ugh. Scheduling. Have you seen that meme? "Scheduling is the SLP's version of Tetris." How accurate this is. I like to think that I'm pretty good at scheduling my kiddos in the school, but the honest truth is that I'm flexible. My schedule changes frequently due to growing caseload, group changes, or teachers' needs.I usually start with the post-it note method seen on many blogs, but then switch over to an Exel spreadsheet in order to make it easy to send to teachers and to make frequent changes. Plus it's a great way to add color to my day!

At the beginning of the year, I like to give teachers a half sheet of paper that lets them mark their prefered times. This takes some of the pressure off of my and puts it onto them.


I primarily see kiddos in block of 10, 20, or 30 minute intervals. The schedule I like to use is split into 10 minute increments. You can find an editable Microsoft excel spreadsheet with 10, 20, or 30 minute increments HERE.

Now comes the fun part - personalize!

Here's a step-by-step tutorial to make scheduling a little brighter and cleaner. First, select the worksheet you want; you can pick 10, 20, or 30 minute increments. Next, to add a student, select the cell or cells that you need. For example, I see a group of kindergarten students for 30 minutes. Since I am using the 10 minute schedule sheet, I select 3 cells (7:30-8:30).


Now the fun part - adding color! I like to use different colors for each grade level, but you could use different colors for disorder type, how big the group is, or anything you want. For my kindergarten students, I'm going to use red, so I select the fill arrow (the arrow to the right of the paint bucket) and select red.


I can then enter the names or the type of group I will be seeing into the top cell.


Most sessions are more than once a week, so a simple way to add this to Wednesday is to highlight the 3 red cells and copy (ctrl+c) and paste (ctrl+v).


Viola! Now to add in other groups with more colors. If you have a different start time, you can change that on the left side.


Now printing from Excel can be tricky. You will need to select all the cells you wish to print. Once in the print menu, make sure you select "Print selection" and "fit to page," otherwise you might have the schedule printed on multiple pages.

I hope this makes your scheduling easier and more colorful!

Repurpose! Reuse!

Repurpose! Reuse! Recycle! I remember those words from recycling initiatives when I was younger along with those, "How can we save the Earth?" topics. My family didn't grow up with much money and we used old milk crates and ice cream buckets to store toys. Thanks to my mom, I have found some really creative ways to store things within my speech/language space. I thought I would share some of the ways I reuse and repurpose containers for storage. Re- a prefix meaning back or again! (Love those prefixes for my middle schoolers).

Here's a bunch of my repurposed containers.


One of my favorites is an old parmesan cheese container that I use to store chipper chat chips (and there's alliteration!). This is by far my favorite repurposed container. I can shake out the chipper chat chips super easily from the "pour" side and putting them back in is as easy as unscrewing the lid.

Another of my favorites is an old animal cracker container covered in paper. Wow is this thing versatile. I use it similarly to Ned's Head or play "what's in the box" when working on describing or making inferences. The only problem is that you need to eat tons of animal crackers!
I typically use stamp cards within my room to earn prizes. For 2 of my students with ASD, this wasn't rewarding. So, I thought like Superflex! I knew they liked Pokemon and found some beading crafts. Now, they earn a bead for following directions, coming with me the first time I ask, etc. This is very motivating because when they are finished, we make the craft (plus there are about 60 beads per craft so it takes a long time). I use old spice containers because they are clear and small.

Last year, I got married and we received some brand new kitchen storage containers. Happily, I took the old ones to school and I now use them to store various game pieces (Candy Town from Speech Room News pictured here).
Because of our lowered printing budget, I like to print many of my things on colored card stock. Sometimes I get around to laminating them, but most of the time I don't. I put packing tape on the back of cards I will hang on my wall so that my blue sticky tack doesn't leave a stain or so that any masking tape doesn't tear off part of the paper. 

Other Items

  • Pringles Can = Weekly PBIS ticket drawing bucket
  • Hot chocolate mix containers = bins to draw cards, craft supply storage
  • Ice cream bucket = bean bucket (it needed a lid!)
  • Crayon Tin from the dollar store = pencil holder
  • Tea tin = colored pencil holder
  • Zibloc bags = the mother of all containers
What containers have you repurposed?